

This Mama got bored last weekend and decided it was time to tackle a project that has been on my wish list/ to-do list for a long, long time. Like 9 years! Since we moved into our house, we have wanted to remove the carpet from our stairs and paint them. Well to be perfectly honest, remove the carpet from our entire house. It has taken a lot of patience and planning.
Spring fever has been hitting me hard lately. I want to “do” stuff, “make stuff, “clean” stuff! It’s bad this year. Last Saturday afternoon, I was sitting on the couch with my daughter. My husband was working all day. I looked across the room and thought, “I’m doing it. Today is the day!” That carpet is coming off those stairs.
I have pinned so many pages on Pinterest with what I wanted to do. Paint the treads black and the risers white. I had no idea what I would find under the carpet. But I had pulled a little bit back on the top step and saw that there was at least an overhang on the treads. Not perfect wood but okay to paint black.
I grabbed my razor cutting tool and made the first cut across the carpet at the top of the staircase. I left a 2-3 inch overhang when I made that first cut because I really didn’t have a plan at that moment. I ended up cutting it a little more and folding the carpet under and stapling it down at the edge of the wood that is at the top of the staircase. This works fine for now. I have plans to install hardwoods in our upstairs hallway. I only want to have carpet in the bedrooms one day. Hopefully that will happen next Summer.
Then, pulling off carpet officially began.


After removing all of the carpet, I pulled up the padding and removed the tack strips as I went. I used our small pry bar and a hammer to carefully remove them. No matter how hard you try you will dent the wood somewhere. Don’t worry. Wood putty is the best!

After removing all the pad and tack strips, the real work began. I started pulling out the gazillion staples that held down the padding (and the padding from the original carpet that was installed in 1978). I can not believe how many staples are used for padding! I did use a very small screwdriver to get under many of the staples. I then removed the staples with pliers.
Tip – wear gloves when pulling out the staples. I didn’t expect to get a ridiculous blister on my ring finger from squeezing the pliers so hard.
You can also see where I had painted the wood trim white back in 2005. See that brown line? That is where the carpet was and how close I could get with the carpet there.
Wow! What a difference! This is after all the staples were removed and I called it a day.

Sunday, I headed to Home Depot to buy wood putty and paint brushes. I already had the white paint I need to use for the risers. It is the same trim paint I have used throughout the house. I also already had the black paint I wanted to use on the treads. I picked Onyx Black from Glidden in Eggshell finish. It’s perfect for the stairs in my opinion. I wanted something that would not be a slick as the high gloss white I used on the risers.
Below is a picture of after using the wood putty on all the many spots where the staples were and also to cover any boo-boo’s I made when removing the tack strips. I also filled any other holes in the wood that I saw that needed filling.

I spent about an hour on Monday sanding all the wood puttied spots and also the sides of the stairs where I had painted the trim white years ago. I then wiped the entire staircase down with a damp cloth to remove the dust from sanding.
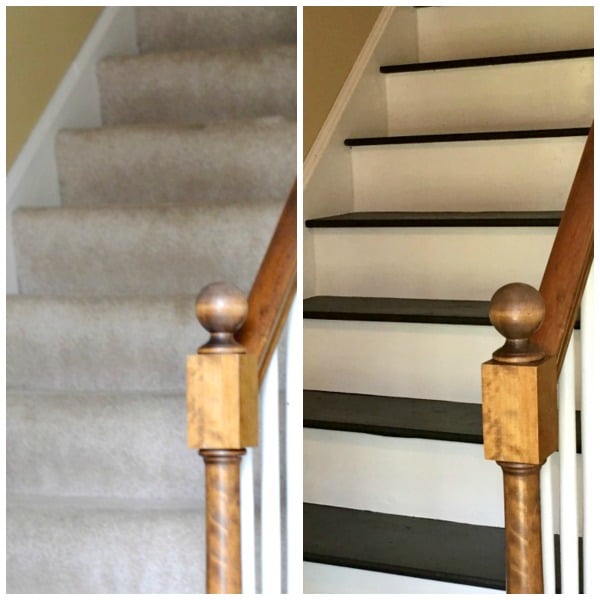
Then, I started painting the risers and side trim white. I can see the transformation happening! Yippee!
I painted another coat of white paint later in the day Monday. Each coat only took me about an hour or so to apply.
Tuesday morning I painted the third and final coat of white paint.

Tuesday afternoon, I started to paint the first coat of black. Again, it took me about an hour. The best way to start is to do every other step so you can still go up and down if you need to.
I contemplated taping off the white area before starting the black on the treads. But decided I would give it a try free handing with a 1 12 / inch angled brush. It was much easier than I expected. Taking your time really pays off.

A few hours later, I painted the other alternating steps black. I am completely in love! It’s another project that I ask myself “Why did I wait SO long to do this!
I painted a second coat of black on Wednesday.

Friday morning it was time to start the finishing touches. Caulking the seams along the walls completes it wonderfully! I use a damp t-shirt to wipe my bead of caulk after applying it to make it nice and smooth. I’m also able to wipe any excess away.
Before Caulk – see the gaps on the each side?

After Caulk – gaps are all gone 🙂

I painted my 3rd and final coat of black paint on Friday afternoon when the house was completely empty for hours. I didn’t worry about painting every other step this time. I just started at the top and made my way down.
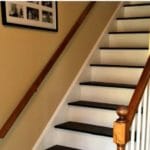
I am so, so happy with how they turned out. I can’t believe how wonderful they look. They are not “perfect” brand new everything stairs and imperfections can be seen if you look really close here and there. But they look a million times better and cleaner than with the carpet. I love the character of the older wood.


Marie
I have the exact same staircase. I have hardwood under the carpet, but I am going to carpet all the stairs with the hollywood edge and the last five stairs where it stats jutting out, I am going to the hardwood showing along the railing. How does this sound to you?
Carol
I have no idea what is under our ugly carpet on the stairs. But if the wood is as good as yours, I know now I can paint it! Thanks for the inspiration. It looks great! Now to have the courage to see what lies beneath my carpet…
Sherri
I didn’t either! I could kind of feel the rounded edge in a corner. But I was so over the carpet I didn’t care at the time.
Nita
Definitely awesome! I’m gonna give it a try. I’m inspired
Diane Brown Fowler
What type of “caulk” do you use?
Lindsay Rice
Same question!
Linda Bialecki
WOW!! Your stairs look FABULOUS!!! I was thinking about painting my stairs too, but I chickened out and ordered Hardwood flooring for my whole upstairs and stairway. I wish that I saw your project first. Hooray to you for an exceptional job!!
Sherri
Thank you so much! I still love how they look to this day 🙂
Cristi
I found your guide to completing this project very helpful! I did a lot of research before getting started and gathered all of the tools and materials I needed in advance. It was a lot of work but what an amazing difference! I painted all of the handrails black as well as the treads. My staircase transformation took a total of 40 hours to complete (in phases). I made the mistake of taping and had to spend a lot of time correcting the paint bleed. Live and learn, right?!
I’m so happy with the result and have received so much positive feedback! Wish I would have done this years ago! Thank you for sharing your experience. It was a huge help to me!! Cristi
Sherri
Thank you so much for letting me know! It makes me so happy to hear this! I couldn’t agree more about “live and learn”. That is me on the majority of my projects. haha Enjoy your new stairs!
Melissa
I might be wrong. I thought wood putty cannot be sand it. You mean wood filler?
Sara
They look great! Are they slick or slippery at all? Worried about my kids on them. Also, what did you do at the very top? I have a carpeted hallway at the top of mine.
Sherri
Thank you so much! They are actually not slick but I always remind my kids to take it slow just in case. I slid down on our carpeted stairs more than once in socks. I think not having a polyurethane coat on them helps with slickness too.
At the top of the stairs, I left a couple of inches overhang of carpet when I was removing it, then tucked it in and nailed in down in a few places with small tack nails.
Jennifer Smith
Girl! You are JUST the inspiration that I needed to get my stairs done! I loathe carpet! Tomorrow, we are getting a wall knocked down to open up the living/dining into one big open space. We will be doing the floors in the dining room ourselves. We are using plywood for hardwood flooring! The stairs will be the icing on the cake for me!!
Thank you!!!
Jennifer Smith
Sherri
Oh, I am so glad! It made such a difference for us! (We have since gotten rid of all our carpet too thankfully) I love the idea of using plywood for hardwood flooring!
ANGELA PROFFITT
Hello Sherri
I have just been looking at your pictures and I am totally inspired I have been talking about taking the stair carpet up for ages, I will have a job on my hands as some of the treads are really creaky but I want to paint my stairs the same as yours they look absolutely fab well done you.
Regards Angela
Sherri
Thank you so much! It’s still my favorite project that I have done!
Tamieka
They look great!!
Spring fever has me wanting to rip it all up…you have been an inspiration!!