

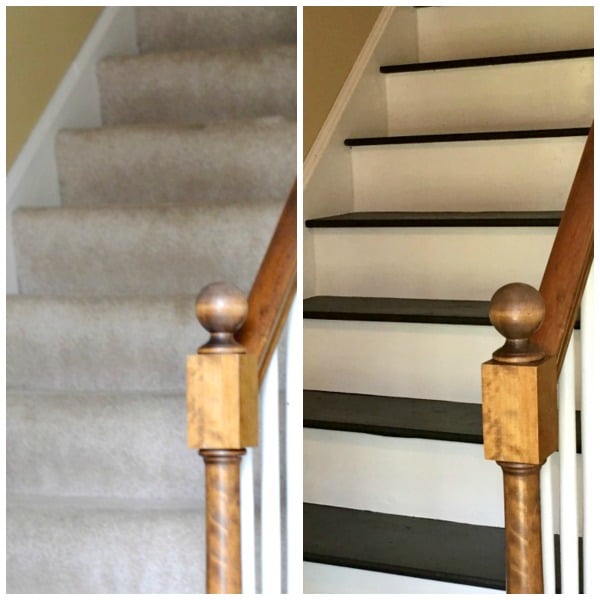
This Mama got bored last weekend and decided it was time to tackle a project that has been on my wish list/ to-do list for a long, long time. Like 9 years! Since we moved into our house, we have wanted to remove the carpet from our stairs and paint them. Well to be perfectly honest, remove the carpet from our entire house. It has taken a lot of patience and planning.
Spring fever has been hitting me hard lately. I want to “do” stuff, “make stuff, “clean” stuff! It’s bad this year. Last Saturday afternoon, I was sitting on the couch with my daughter. My husband was working all day. I looked across the room and thought, “I’m doing it. Today is the day!” That carpet is coming off those stairs.
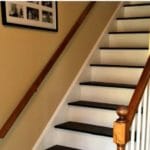
I have pinned so many pages on Pinterest with what I wanted to do. Paint the treads black and the risers white. I had no idea what I would find under the carpet. But I had pulled a little bit back on the top step and saw that there was at least an overhang on the treads. Not perfect wood but okay to paint black.
I grabbed my razor cutting tool and made the first cut across the carpet at the top of the staircase. I left a 2-3 inch overhang when I made that first cut because I really didn’t have a plan at that moment. I ended up cutting it a little more and folding the carpet under and stapling it down at the edge of the wood that is at the top of the staircase. This works fine for now. I have plans to install hardwoods in our upstairs hallway. I only want to have carpet in the bedrooms one day. Hopefully that will happen next Summer.
Then, pulling off carpet officially began.


After removing all of the carpet, I pulled up the padding and removed the tack strips as I went. I used our small pry bar and a hammer to carefully remove them. No matter how hard you try you will dent the wood somewhere. Don’t worry. Wood putty is the best!

After removing all the pad and tack strips, the real work began. I started pulling out the gazillion staples that held down the padding (and the padding from the original carpet that was installed in 1978). I can not believe how many staples are used for padding! I did use a very small screwdriver to get under many of the staples. I then removed the staples with pliers.
Tip – wear gloves when pulling out the staples. I didn’t expect to get a ridiculous blister on my ring finger from squeezing the pliers so hard.
You can also see where I had painted the wood trim white back in 2005. See that brown line? That is where the carpet was and how close I could get with the carpet there.
Wow! What a difference! This is after all the staples were removed and I called it a day.

Sunday, I headed to Home Depot to buy wood putty and paint brushes. I already had the white paint I need to use for the risers. It is the same trim paint I have used throughout the house. I also already had the black paint I wanted to use on the treads. I picked Onyx Black from Glidden in Eggshell finish. It’s perfect for the stairs in my opinion. I wanted something that would not be a slick as the high gloss white I used on the risers.
Below is a picture of after using the wood putty on all the many spots where the staples were and also to cover any boo-boo’s I made when removing the tack strips. I also filled any other holes in the wood that I saw that needed filling.

I spent about an hour on Monday sanding all the wood puttied spots and also the sides of the stairs where I had painted the trim white years ago. I then wiped the entire staircase down with a damp cloth to remove the dust from sanding.
Then, I started painting the risers and side trim white. I can see the transformation happening! Yippee!
I painted another coat of white paint later in the day Monday. Each coat only took me about an hour or so to apply.
Tuesday morning I painted the third and final coat of white paint.

Tuesday afternoon, I started to paint the first coat of black. Again, it took me about an hour. The best way to start is to do every other step so you can still go up and down if you need to.
I contemplated taping off the white area before starting the black on the treads. But decided I would give it a try free handing with a 1 12 / inch angled brush. It was much easier than I expected. Taking your time really pays off.

A few hours later, I painted the other alternating steps black. I am completely in love! It’s another project that I ask myself “Why did I wait SO long to do this!
I painted a second coat of black on Wednesday.

Friday morning it was time to start the finishing touches. Caulking the seams along the walls completes it wonderfully! I use a damp t-shirt to wipe my bead of caulk after applying it to make it nice and smooth. I’m also able to wipe any excess away.
Before Caulk – see the gaps on the each side?

After Caulk – gaps are all gone 🙂

I painted my 3rd and final coat of black paint on Friday afternoon when the house was completely empty for hours. I didn’t worry about painting every other step this time. I just started at the top and made my way down.
I am so, so happy with how they turned out. I can’t believe how wonderful they look. They are not “perfect” brand new everything stairs and imperfections can be seen if you look really close here and there. But they look a million times better and cleaner than with the carpet. I love the character of the older wood.


Norma
The stairs look fabulous. Thank you for posting this. I’m wanting to rip out the carpeting on my stairs too. I hate it. You’ve written a great how-to, guide. Thanks!
Janin
You did a fantastic job!! Kuddos to you!! I am staring at my hair way..ugh!! I hate carpet!!
Great job!!
Jennifer
Did you apply a poly finish or wax after everything was finished? How are they holding up, any chipping in the paint? They look beautiful!! Fabulous job
Sherri
Hi! No I did not add a finish. They have held up amazing!! No chipping at all in over 3 years. I could not be happier with them still!!
Jennifer
Love them!!! Love the pictures and story! I am a newbie at this stuff but beginning work on a few home improvement projects like this one! I’m going to rip out that basement stairs carpet right now!!! Thanks for the tips!
Xoxo
Allison
We just ripped our carpet up last week. Guess what….blister on the ring finger too.
Homer
Other manufacturers are producing carpet cushion materials that utilize recycled materials for
example recycled post-industrial fibers, recycled polyurethane, and jute and hair.
The snow is falling, the cold winter wind is blowing, and most could imagine
that allergy concerns are gone because of this year.
Once or twice a year, I recommend that you simply shampoo or steam clean youhr carpet.
Donna Jones
Your steps look awesome! I want to do the same. What if I ripp the carpet off and find out the wood isn’t good enough to paint and leave in covered
Reba
Hello,
We’re wanting to do something like this in our home. What product did you use for the paint? Is there a specific type of paint?
Julie Squires
Looks great! Now you need to paint the railings that are wood black and keep the white spindles as they are:)
Jen
Was it a special floor paint for the black ? Did it hold up to traffic ?
Sherri
No actually it is not. It has held up beautifully. Never had to touch up!
Karen
What a great job you did on these stairs. I am just thinking of starting this project and I’m so glad to see that you are still replying to comments because there have been a couple of things that I can’t wrap my head around and is preventing me from starting. I am concerned about the noise factor of uncarpeted stairs. Is it very loud? I also can’t picture how this looks at the top of the stairs, how does it flow with the upstairs hallway?
Sherri
Hi Karen! Thanks so much! Surprisingly, they are not noisy. I can hear when someone is coming or going more distinctly but I wouldn’t call it noisy. At the top of the stairs (where I still have carpet) the carpet is folded under neatly and stapled carefully down. It has stayed put for years. 🙂
Diane
So happy to find this site. I can’t stand looking at my carpeted stairs and now I know what my project will be as well. Yours turned out beautifully… I love how you admit they aren’t perfect, etc., but nothing is perfect 🙂
Sherri
Thank you so much! I tell everyone that it it my all time favorite makeover! I haven’t had to touch up anything in years 🙂
Diana
Great job. Funny I’ve been thinking of doing the same thing. We have dogs so I need to put samthing on the steps when done, so us and our animals don’t scratch it up. Thanks for posting.
Sherri
Thank you! Believe it or not, we had an 80 lb Rhodesian Ridgeback and her nails didn’t scratch them at all. I couldn’t believe it. The paint still look great after all this time. 🙂
Connie
It looks fabulous! Two hints: Use actual floor paint, it will last longer (although a free can of paint is great- you did the whole thing for almost nothing!) and tack cloths….they are cheesecloth impregnated with a sticky substance. You use them to wipe the job after sanding. They pick up every little piece of dust!
Kimberley
Thank you!
Stephanie Davis
Your stairs are beautiful! The picture is hard to tell but is the edge of the stair rounded?
Sherri
Thank you so much!! Yes, my edges are rounded. I had to try and “feel” for that before I ripped the carpet off 🙂
Rebecca S
Great work!!! I’d love to do this. But we have a landing in the middle. What would YOU do with that? I’d appreciate any suggestions. You’ve just done such incredible work.
Sherri
Honestly, knowing me, I would just paint that landing black too! (just like it would be if it were stained) 🙂