

This Mama got bored last weekend and decided it was time to tackle a project that has been on my wish list/ to-do list for a long, long time. Like 9 years! Since we moved into our house, we have wanted to remove the carpet from our stairs and paint them. Well to be perfectly honest, remove the carpet from our entire house. It has taken a lot of patience and planning.
Spring fever has been hitting me hard lately. I want to “do” stuff, “make stuff, “clean” stuff! It’s bad this year. Last Saturday afternoon, I was sitting on the couch with my daughter. My husband was working all day. I looked across the room and thought, “I’m doing it. Today is the day!” That carpet is coming off those stairs.
I have pinned so many pages on Pinterest with what I wanted to do. Paint the treads black and the risers white. I had no idea what I would find under the carpet. But I had pulled a little bit back on the top step and saw that there was at least an overhang on the treads. Not perfect wood but okay to paint black.
I grabbed my razor cutting tool and made the first cut across the carpet at the top of the staircase. I left a 2-3 inch overhang when I made that first cut because I really didn’t have a plan at that moment. I ended up cutting it a little more and folding the carpet under and stapling it down at the edge of the wood that is at the top of the staircase. This works fine for now. I have plans to install hardwoods in our upstairs hallway. I only want to have carpet in the bedrooms one day. Hopefully that will happen next Summer.
Then, pulling off carpet officially began.


After removing all of the carpet, I pulled up the padding and removed the tack strips as I went. I used our small pry bar and a hammer to carefully remove them. No matter how hard you try you will dent the wood somewhere. Don’t worry. Wood putty is the best!

After removing all the pad and tack strips, the real work began. I started pulling out the gazillion staples that held down the padding (and the padding from the original carpet that was installed in 1978). I can not believe how many staples are used for padding! I did use a very small screwdriver to get under many of the staples. I then removed the staples with pliers.
Tip – wear gloves when pulling out the staples. I didn’t expect to get a ridiculous blister on my ring finger from squeezing the pliers so hard.
You can also see where I had painted the wood trim white back in 2005. See that brown line? That is where the carpet was and how close I could get with the carpet there.
Wow! What a difference! This is after all the staples were removed and I called it a day.

Sunday, I headed to Home Depot to buy wood putty and paint brushes. I already had the white paint I need to use for the risers. It is the same trim paint I have used throughout the house. I also already had the black paint I wanted to use on the treads. I picked Onyx Black from Glidden in Eggshell finish. It’s perfect for the stairs in my opinion. I wanted something that would not be a slick as the high gloss white I used on the risers.
Below is a picture of after using the wood putty on all the many spots where the staples were and also to cover any boo-boo’s I made when removing the tack strips. I also filled any other holes in the wood that I saw that needed filling.

I spent about an hour on Monday sanding all the wood puttied spots and also the sides of the stairs where I had painted the trim white years ago. I then wiped the entire staircase down with a damp cloth to remove the dust from sanding.
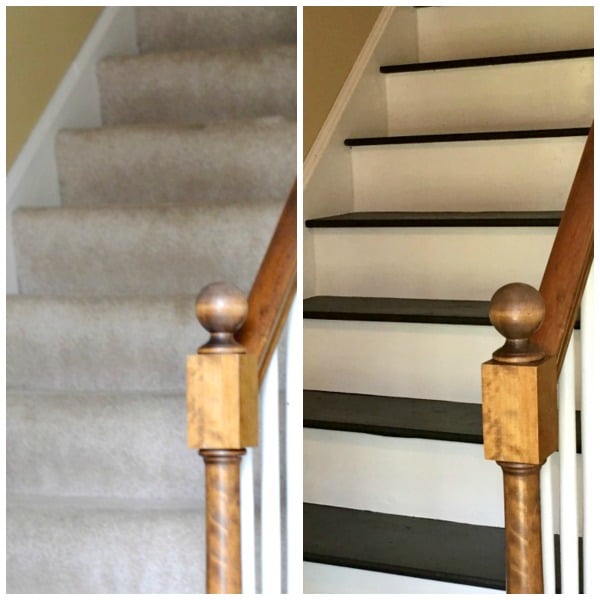
Then, I started painting the risers and side trim white. I can see the transformation happening! Yippee!
I painted another coat of white paint later in the day Monday. Each coat only took me about an hour or so to apply.
Tuesday morning I painted the third and final coat of white paint.

Tuesday afternoon, I started to paint the first coat of black. Again, it took me about an hour. The best way to start is to do every other step so you can still go up and down if you need to.
I contemplated taping off the white area before starting the black on the treads. But decided I would give it a try free handing with a 1 12 / inch angled brush. It was much easier than I expected. Taking your time really pays off.

A few hours later, I painted the other alternating steps black. I am completely in love! It’s another project that I ask myself “Why did I wait SO long to do this!
I painted a second coat of black on Wednesday.

Friday morning it was time to start the finishing touches. Caulking the seams along the walls completes it wonderfully! I use a damp t-shirt to wipe my bead of caulk after applying it to make it nice and smooth. I’m also able to wipe any excess away.
Before Caulk – see the gaps on the each side?

After Caulk – gaps are all gone 🙂

I painted my 3rd and final coat of black paint on Friday afternoon when the house was completely empty for hours. I didn’t worry about painting every other step this time. I just started at the top and made my way down.
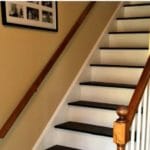
I am so, so happy with how they turned out. I can’t believe how wonderful they look. They are not “perfect” brand new everything stairs and imperfections can be seen if you look really close here and there. But they look a million times better and cleaner than with the carpet. I love the character of the older wood.


Kate
I love this and am dying to do my own stairs. I’m curious, though, have you at any point wanted to put treads or a runner on? I’m wondering if my boys will end up slipping. Thoughts? Thanks.
Sherri
Hi Kate! I haven’t actually. Believe it or not, I slip less now that I did on the carpeted stairs. LOL Maybe I’m just more careful about it too. I have been so happy with how they turned out! have not even had to touch up the paint at all. One of my favorite projects for sure!
Joanne Dwy
I, too, have been contemplating taking the ugly carpeting off the stairs. The problem is that our home is a four-piece modular and I think the treads under the carpets are as thick as a 2×4. I’ll probably have to purchase new treads, which are not cheap! Your stairs look great! Thank you for sharing. You’ve given me the courage to take on the job!
Diane + Dean DIY
This is so amazing and inspiring that you did this by yourself. The only carpet we have left in the whole house is on the stairs and I have been thinking it was going to be a huge project. I hope that ours has the rounded edges so I can get started tomorrow and surprise my hubby when he gets back from his business trip Friday.
Do you think a dark gel stain would hide the putty once sanded?
Nicole
Love how your stairs look! What are the exact names and brands of the paint you used? Also, is it special paint for withstanding the traffic on steps? I thought you had to coat steps with polyurethane in order to keep them from becoming worn out. Thanks!
Heidi
Beautiful!
That did you do at the top where the carpet meets the stairs?
Sherri
I actually folded the carpet neatly and stapled it down with my staple gun on the corners and in the center. You could probably use a carpet glue as well but this has worked fine for a couple of years now.
harm
Well done, but our stairs are fixed with kit and then you will have an other problem how to remove those kit. :<( this is a bad thing i think
sue
I found your blog after I did mine. Pretty much the same even the every other stair idea. This is my third set that I have done. The first two I put the kit on so that they are hardwood. But this is my temporary idea. Like you I have posts in the stairs. You only have 5 I have them all. Have you seen a blog that addresses that issue. I have the risers and treads ready to go in but I am just unsure about the removal and putting the posts back. Did you use a oil or latex on your treads? I am using tremclad oil and latex on the risers. My risers are chip board so the effect is very rustic. Thanks for any advise
Barbara Hafner
I am going to be doing this same project in my house. I would like to know….Is there a reason why you caulked after painting rather than before? Thanks so much for your inspiring post!
Sherri
No, that is my personal preference. I caulk after painting because I like the crisp line that is left after caulking. You could caulk before painting as well and then tape off each step and paint or freehand the line if you’re confident. I tend to worry that my paint line would not be straight. 🙂
Barbara Hafner
I get your point. Thanks!
Denise Gallivan
Thank you for the tutorial of the stairs…WOW!
You made it look so easy!
I also have been procrastinating about ripping up the carpet on the stairs. Now I think it just might happen soon, thanks to you. Well done!
Good luck with the rest of your projects.
Denise from Montreal, Canada.
Denise
I love your stairs, I have a beach house rental with carpet on the stairs and I can’t keep them clean. I have put plastic down and clean them at least 4 times a year. I am going to paint them this Sept. when I go back for a week. Question. Are they slippery, a lot of bare feet and flip flops. I have to do SOMETHING, going crazy cleaning these stairs.
Sherri
Thank you!! As crazy as it may sound, they are less slippery than the carpet was! 🙂 I slipped down those carpeted stairs more than a couple of times. I didn’t use any polyurethane on mine either just to be safe. We have our basement stairs done as well.
Linda
That looks great! Do you think it would work with particle board treads?
MRS CAROLINE GARNETT
Retiring this summer and need several new home projects—- FAB one to start with. hanks you.
jenn
That’s really pretty! So inspiring.
I am planning on cutting some self-stick carpet squares to fit the tops of my stairs, but have had no idea how to fill in the major gaps on the sides of the stairways or what to do about the fact that *carpet squares don’t easily fold*. 🙁
But now? I’ll paint the overhang part the same color as our front door and the area that goes up to the treads (not sure what it’s called) “Ancient Brass”. $50 of paint, maybe some sort of gap sealant, perhaps some sanding and a touch of glisten-not-sweat equity, and I’d bet the stairs here can be almost as pretty.
So grateful for this idea and also happy that paint primer exists. 😀
Sherri
It is truly amazing what a little caulk and wood putty can do! 🙂
Breeanna
I’m having a hard time seeing where you put the caulk. Is it along each step by the wall?
Sherri
Yes. That’s right!
Drew
The dark wood looks amazing! I never would have considered doing that to my steps but it worked out very much in your favor. Thanks so much for sharing!
Von
I am curious is that builder’s grade wood on your stairs? I always see stairs redone when hardwood is underneath the carpet. It looks awesome! I would like to do mines.
Sherri
Yes, it is! The good thing is that they are “threads” and have the rounded edge. As long as you can feel that under your carpet you should be good. Not just a piece of wood cut flush with the risers. I pulled up a corner of the carpet a little to feel for it. I love the look of the knots, etc. I just had to use a little wood putty and sanded a couple of spots.
Theresa Mayfield
So you didn’t add wood to the stairs? You were just able to take the carpet up, clean up what was there and then paint? I will check it out! thank you!
Amy
Curious how the paint has help up on the steps after some use. Thanks!
Amy
“held up”
Sherri
It has held up perfect! And I clean them at least every other week with a white vinegar and water mixture. 🙂
M
Do you have pets? I’m tempted to do this to our basement stairs but we have two cats and am wondering how the finish will handle their claws as they go up and down.
Sherri
Yes I have pets 🙂 One 80 lb Rhodesian Ridgeback who would run down the stairs actually. (she just recently passed away) and a little guy. The stairs had held up beautifully! Not a single nail scratch. My basement stairs are done as well too.