


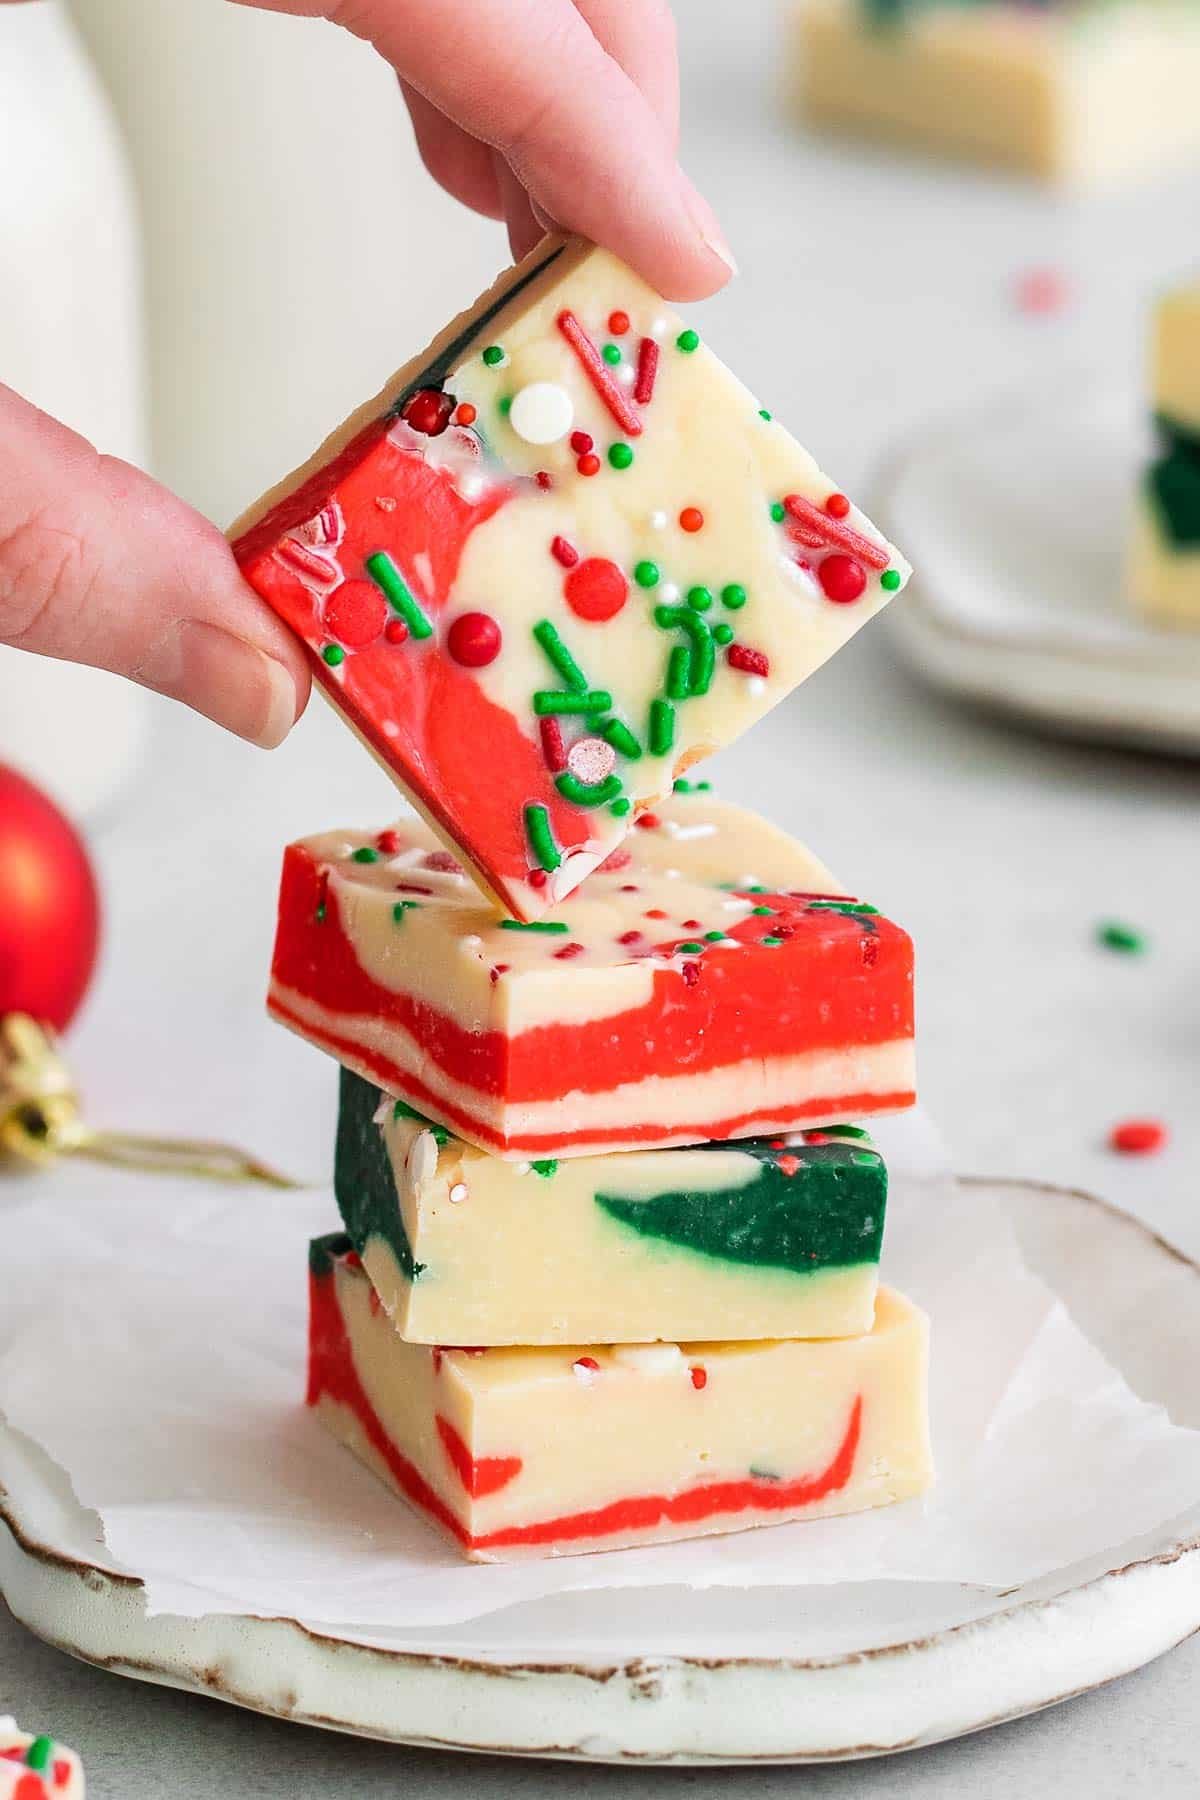
This Homemade Christmas Fudge is an easy fudge recipe made with white chocolate chips, condensed milk, butter, peppermint extract, and red and green festive swirls! Made in the microwave, it’s a rich, creamy, and decadent sweet treat to make for the holiday season!
Need more no-bake Holiday dessert recipes? This Christmas Crack (saltine cracker toffee) is a must make. Or these easy Oreo Balls, Butterfinger Balls or these Peanut Butter Bars are always favorites!
Easy Christmas Fudge
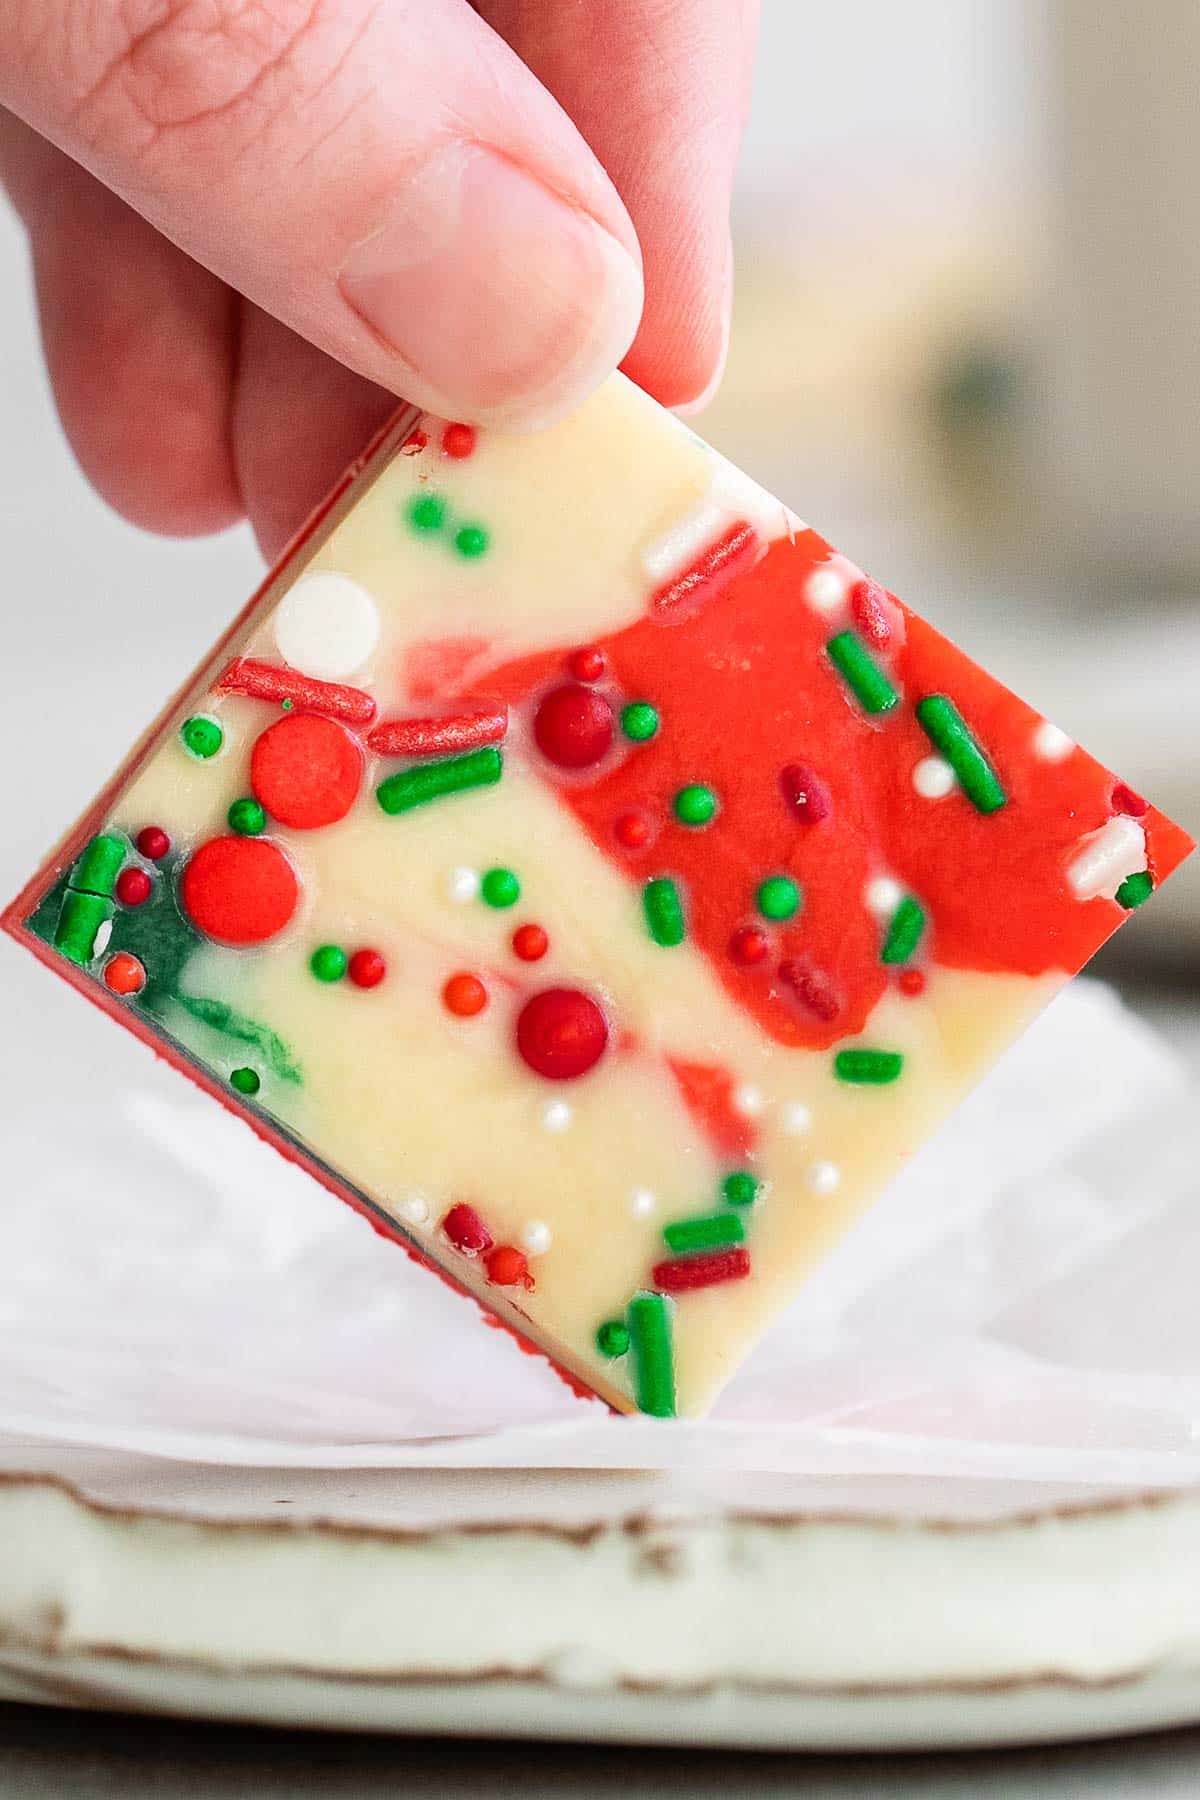
This easy recipe is similar to my 3-ingredient Halloween fudge but this one contains butter for that extra creamy consistency. To represent the Christmas season we’re adding red and green festive swirls and then finishing them with red, green and white sprinkles on top of the fudge.
The peppermint reminds us that mint and chocolate always go hand in hand!
This special sweet treat is so easy to make and yet I like to reserve it for holidays, Christmas cookie trays, and giving to neighbors and friends as edible homemade gifts wrapped in cute containers.
The simple ingredients make this delicious fudge recipe made at home much more cost-effective than buying it at the store and it freezes well so there’s always a way to keep some around!
Would you like to save this?
Ingredients You’ll Need
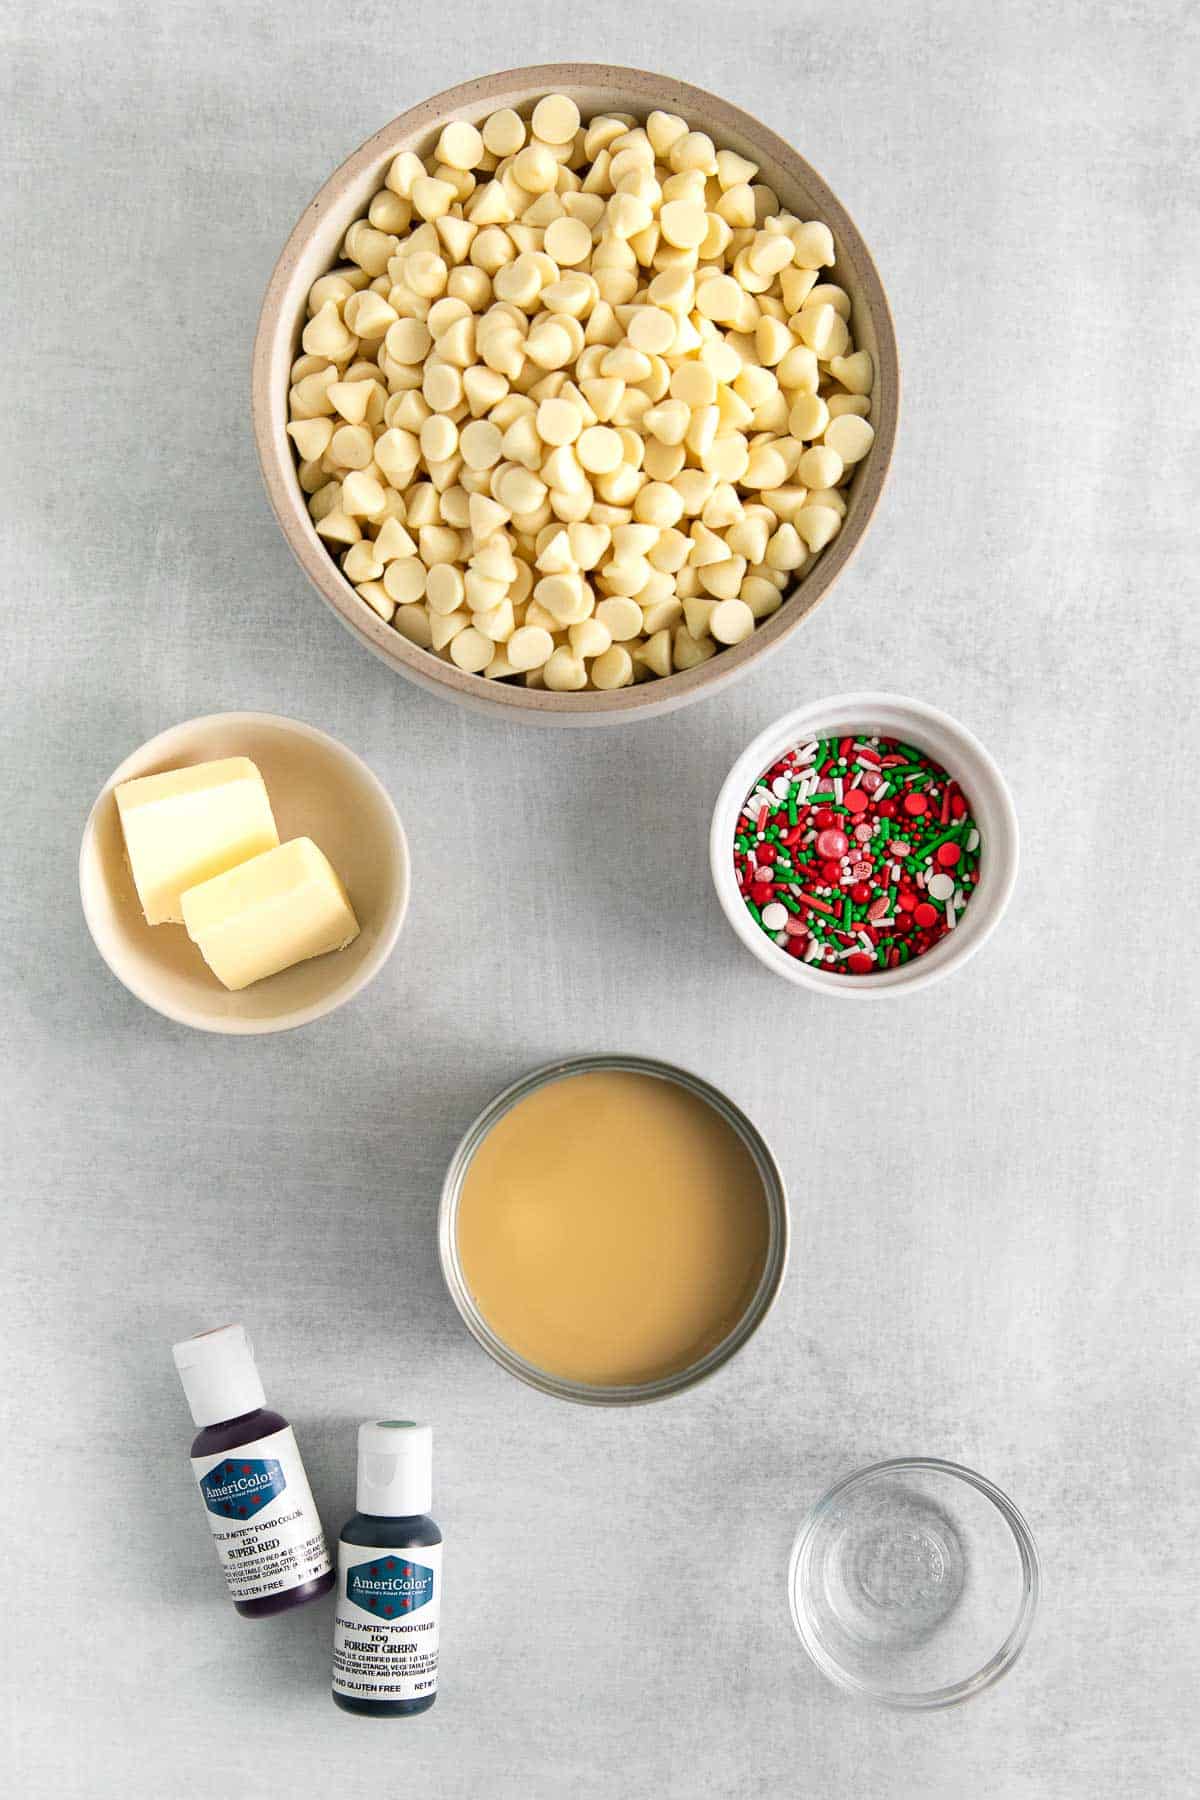
- White chocolate chips: This kind of chocolate melts well in the microwave. No double boiler is needed unless you want to use it. Make this fudge using milk chocolate chips or dark chocolate chips and top it with festive sprinkles for crushed candy canes or a different kind of Christmas fudge!
- Sweetened condensed milk: Sweet, thick, rich milk that’s had the water evaporated from it and sugar added. It’s what gives the fudge its chewy texture and sweet flavor.
- Butter: Helps to make Christmas fudge extra creamy.
- Peppermint extract: Refreshing and minty! It balances out the creamy richness and pairs well with sweet flavors.
- Food coloring: For Christmas, I stick with green and red gel food coloring (or liquid food coloring works as well). Gel food coloring has a higher concentration and is more vibrant with fewer drops but is also pricier.
- Sprinkles: Holiday sprinkles usually come in red, green, and white.
Variations To Try
1. If peppermint extract is not your thing, you can swap it with vanilla extract or even almond extract.
2. Instead of sprinkles you can top the fudge with a crushed candy cane or peppermint candy.
3. For other holidays and special occasions, keep this recipe handy! Use the fudge as a base and swap the food coloring for whatever suits your needs. Red and pink for Valentine’s Day, red white, and blue for the 4th of July, or light pastel colors for Easter.
4. Spread a layer of vanilla frosting over the fudge and then top with the red, white and green sprinkles or crushed peppermint candies.
How to Make this Homemade Fudge Recipe
This recipe will come together in a few steps using just the microwave. Who knew homemade Christmas fudge was this easy?!
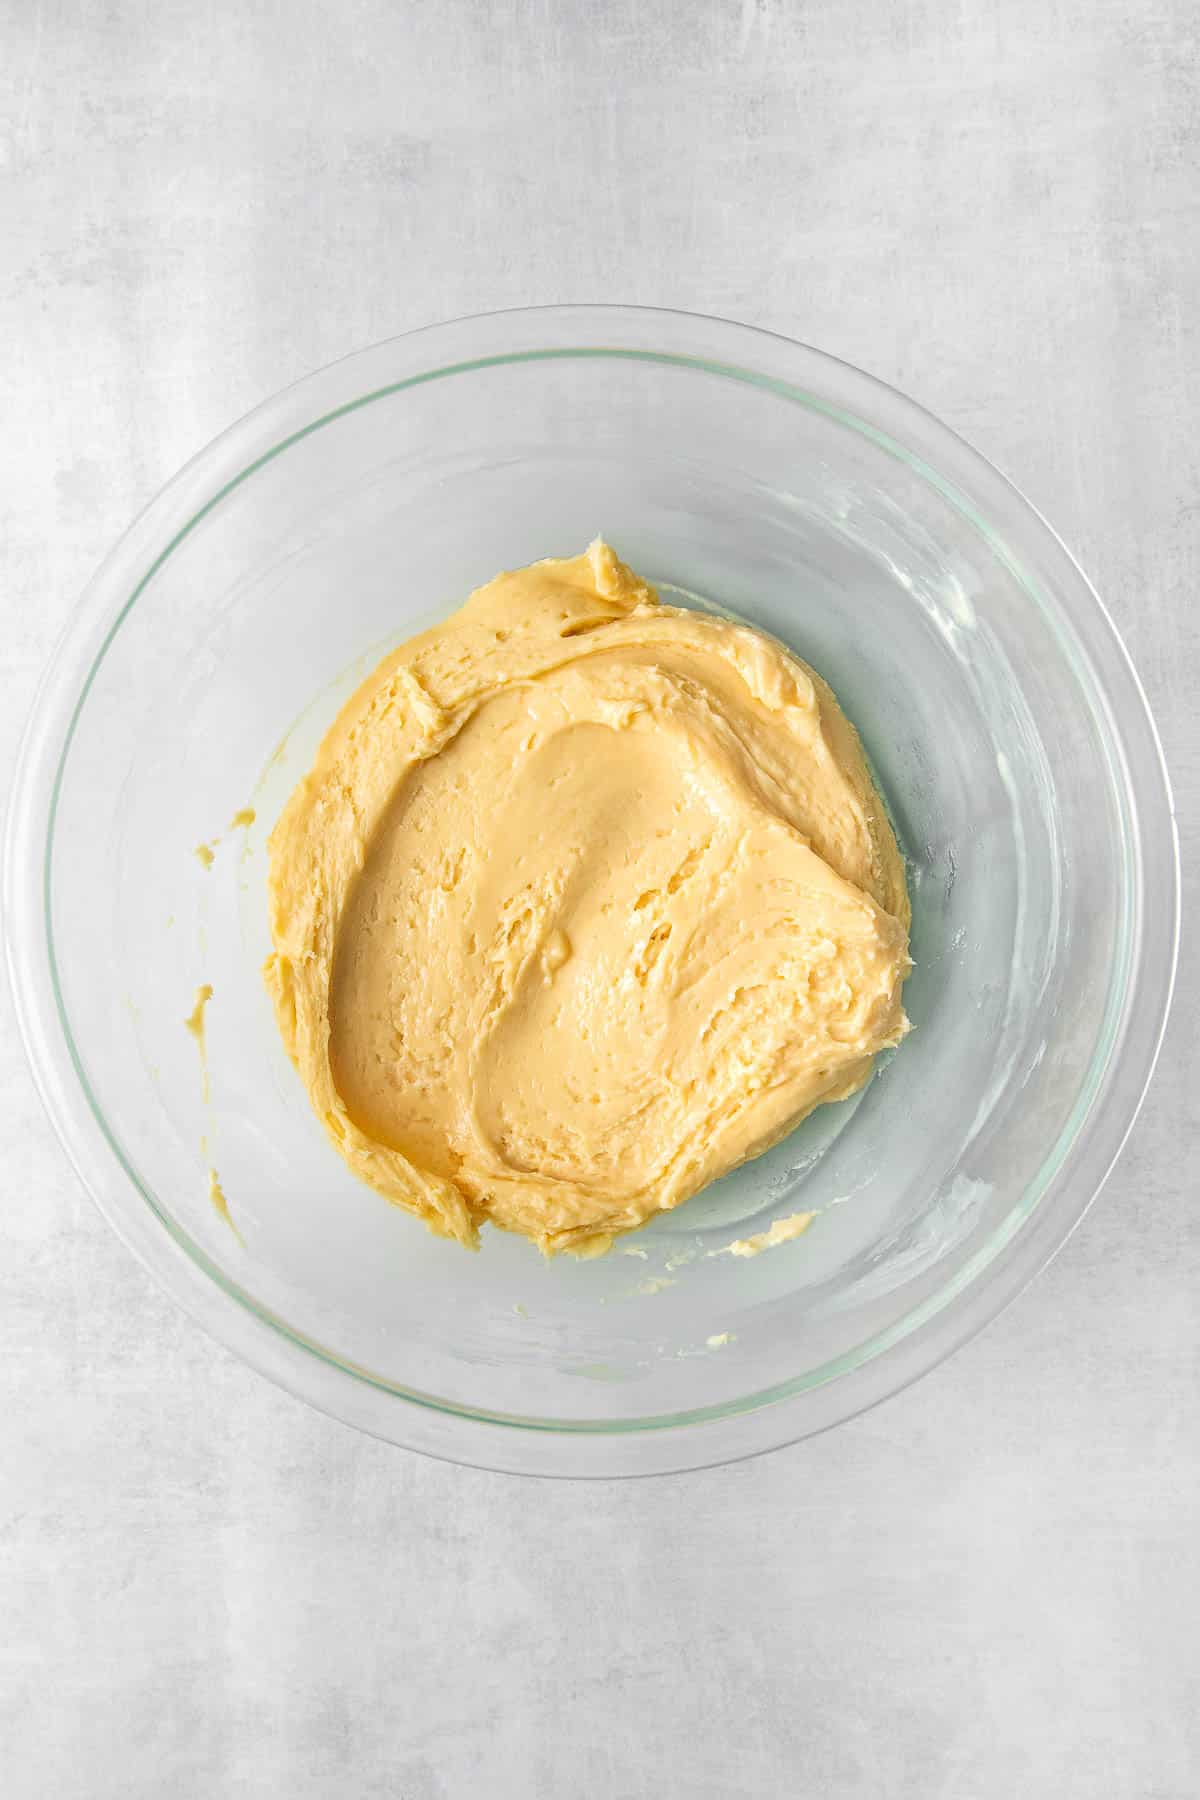
Step 1: In a large microwave-safe bowl, microwave the white chocolate, sweetened condensed milk, and peppermint extract for 1 minute at 30-second intervals, stirring in between. Repeat as necessary until all the chocolate has melted.
Step 2: Place ½ cup of the melted chocolate mixture in a small bowl and add 3-4 drops of red food coloring, and stir well to combine. Work quickly, it will thicken as it cools. Repeat this step for the green food coloring.
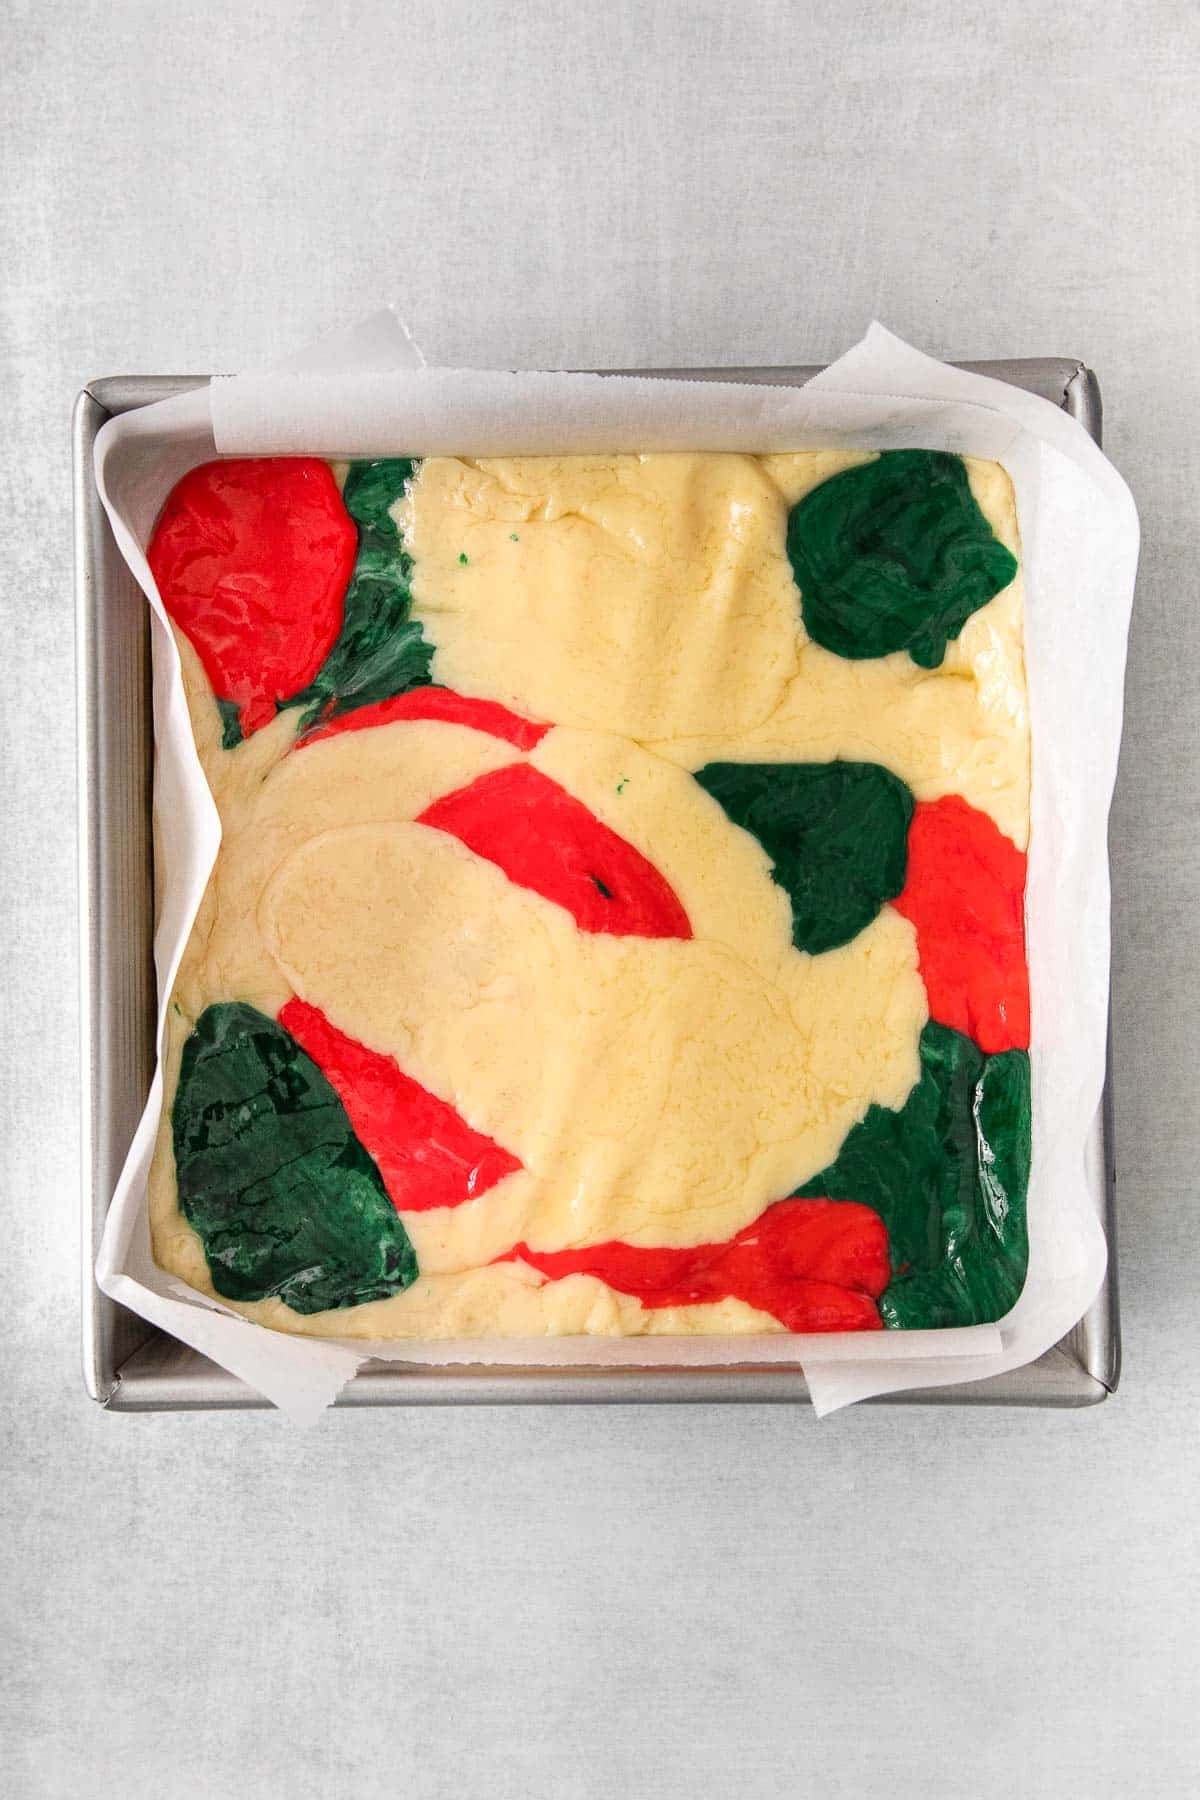
Step 3: Use a spoon to spread dollops of each of the colors including the original white fudge into the parchment paper lined baking dish.
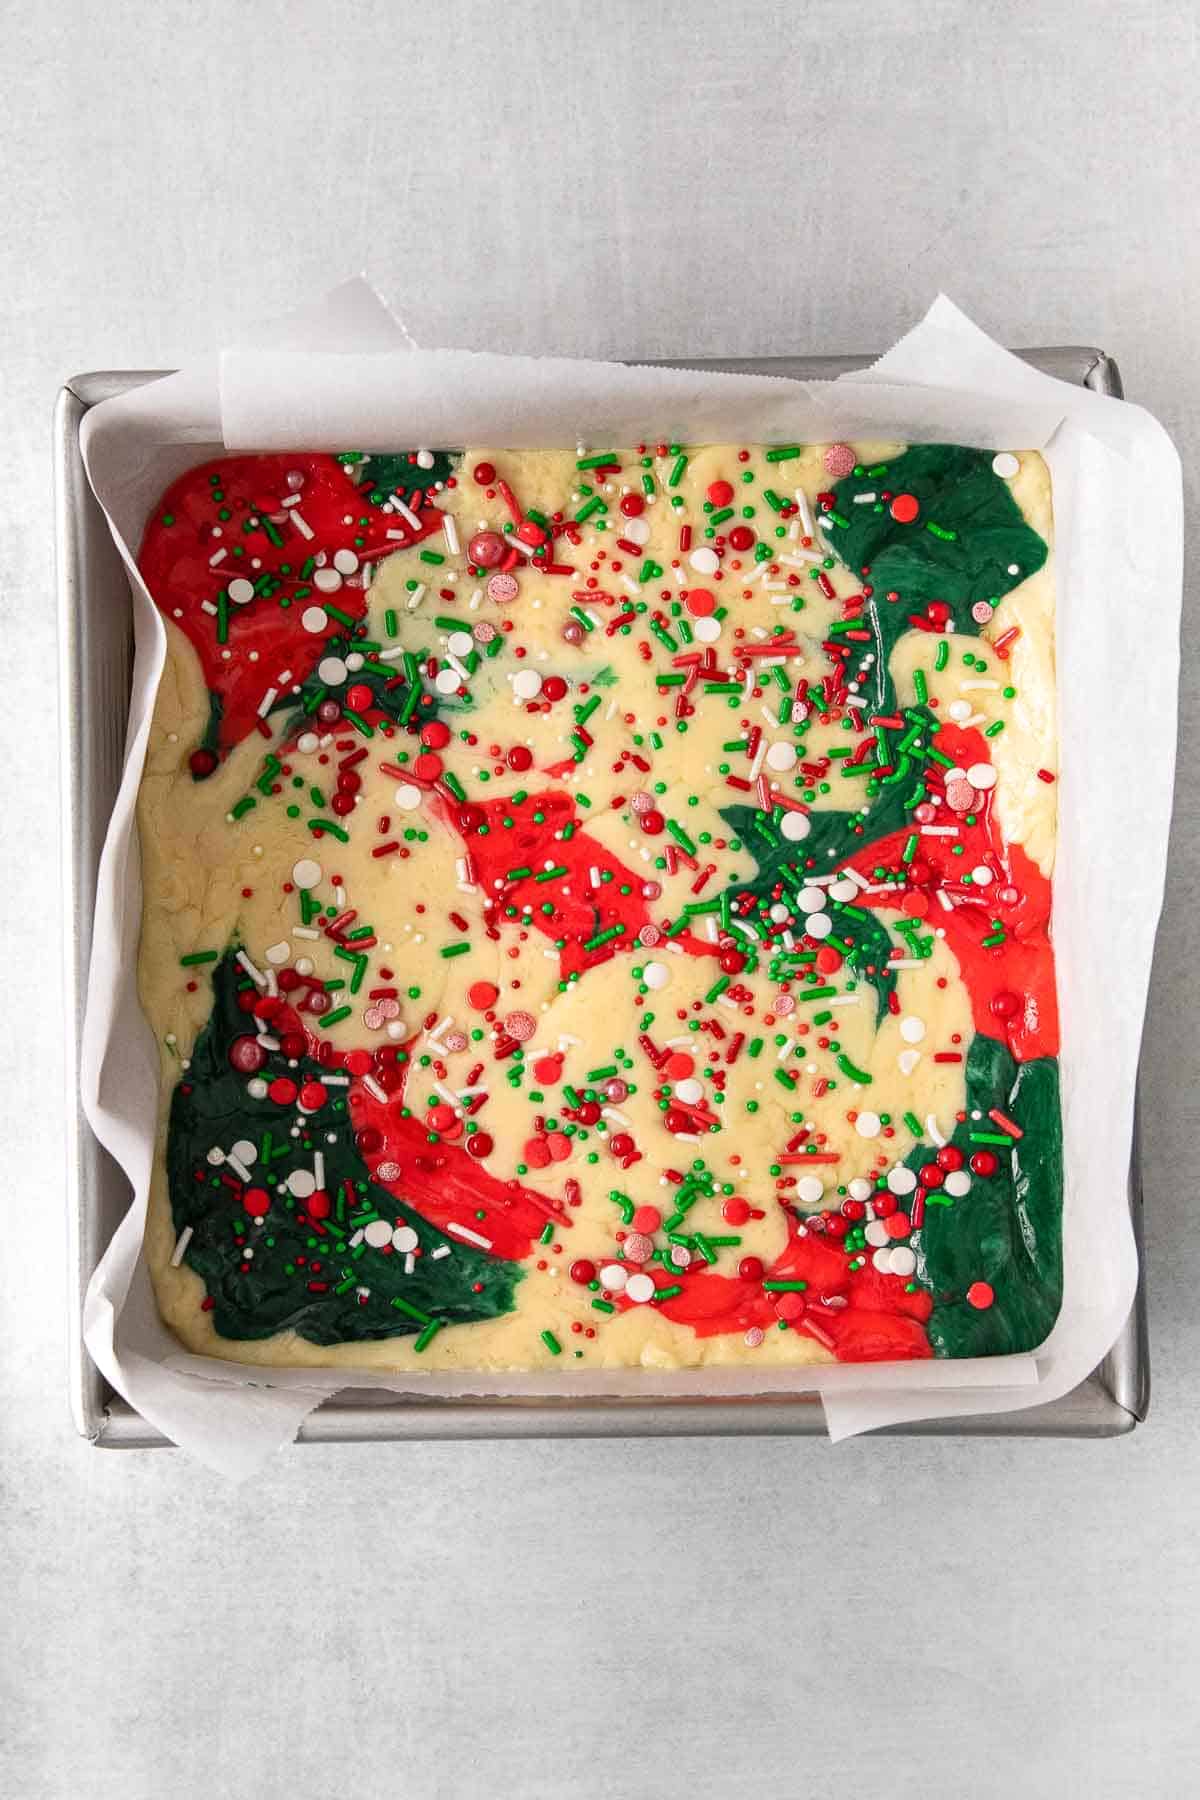
Step 4: When all of the Christmas fudge has been added use a spoon or a butter knife to gently create swirls throughout. Top with sprinkles (or crushed candies) if desired.

Step 5: Transfer the Christmas fudge to the fridge to set for at least 2 hours. Once ready, lift the fudge out of the pan holding onto the parchment paper then slice into even squares of your desired size. Enjoy!
Tips
- When lining the pan with parchment paper, leave enough to come up the sides. It helps to have something to hold on to when you’re lifting the Christmas fudge.
- Heating the chocolate at 30-second intervals is super important. If you overheat the chocolate will seize and need to be discarded. The chocolate will continue to melt as you stir it, so it’s equally as important to stir in between zaps.
- 3-4 drops of food coloring is just the start. Once you stir to combine you can decide if you need to add more to reach the desired vibrancy.
- To get clean lines around your fudge pieces, wipe your knife clean with a kitchen towel in between each slice. It looks prettier that way.
FAQ’s
Keep fudge stored in an airtight container at room temperature for up to 5 days. You can store it in the refrigerator for up to 2 weeks as well as long as it is kept tightly sealed to avoid it drying out.
I can’t imagine there will be any left to store anyway!
The fudge freezes very well! Make it a few months ahead and store it for when you need it at Christmas time to make things a bit easier for you!
Store it in a freezer-friendly bag or airtight container for up to 3 months. Wrap it in layers with parchment paper or wax paper then wrap in aluminum foil to keep moisture out and so they don’t get stuck and frozen together.
You can use a double boiler to melt the chocolate and condensed milk. Heat over medium heat, stirring continuously. As long as you don’t get any water droplets into the mixture, this is a great way to melt chocolate. If any water or steam gets into it, it will seize and harden.
If you like this recipe, please leave us a comment and rate the recipe below. You can also find us on Facebook, Pinterest, Twitter and Instagram!

Christmas Fudge
Ingredients
- 3 cups white chocolate chips
- 14 ounces sweetened condensed milk 1 can
- 2 tablespoons butter
- ½ teaspoon peppermint extract
- ½ teaspoon green food coloring
- ½ teaspoon red food coloring
- 2 tablespoons holiday sprinkles optional
Instructions
- Line an 8×8-inch square pan completely with parchment paper, covering the bottom and all sides completely
- In a large microwave safe bowl, add the white chocolate chips, sweetened condensed milk, butter, and peppermint extract.3 cups white chocolate chips, 14 ounces sweetened condensed milk, 2 tablespoons butter, ½ teaspoon peppermint extract
- Microwave for 30 seconds. Then stir and then heat for an additional 30 seconds and stir again.
- Repeat with one or two more 30 second-intervals, stirring in between eat interval until the chocolate chips have melted. The chips will continue to melt as you stir them. Be very careful not to over heat the chips or they will seize and harden.
- Place ½ cup of fudge mixture in a small bowl and add a 3-4 drops of red food coloring and stir well to combine. It will be thick so stir as quick as you can. Add more food coloring to reach your desired color.½ teaspoon red food coloring
- Place another ½ cup of the fudge mixture into a separate small bowl and add a 2-3 drops of green food coloring and stir to combine well. Add more food coloring to reach your desired color.½ teaspoon green food coloring
- Using a spoon, spread dollops, of each of the colors, all around the prepared pan .
- After all of the fudge is in the pan, and swirl it gently with a spoon or butter knife to create the swirls throughout.
- Top with sprinkles if desired.2 tablespoons holiday sprinkles
- Place the fudge in the refrigerator and for at least 2 hours to set completely.
- Lift the fudge out of the pan by the parchment paper and cut into desired sizes with a sharp knife. For clean cuts, wipe the knife with a paper towel after each cut.
Notes
Nutrition
Nutritional Disclosure
Nutrition information is automatically calculated and should only be used as an approximation.

Vida Sisco
i dont have parchment paper will wax paper work as well
Sherri
It sure will! 🙂
Phillip crandy
Yummy yummy
Sara
I want to use a 9 x 9 pan. What is the increase FOR CHIPS & CONDENSED MILK then?
Sara
Oil want to use a 9 x 9 pan. What is the increase then?
Sherri
I would just use the same measurements 🙂 It may just be slightly thinner.
You could also double the recipe and use a 9×13 dish if you’d like slightly thicker fudge.